Introduction to Sheetrock Fireplace Surrounds
Sheetrock, commonly known as drywall, is a versatile and widely used construction material. It’s made of gypsum plaster pressed between two thick sheets of paper. When it comes to home improvement, particularly fireplace surrounds, Sheetrock offers a sleek, modern, and cost-effective solution. A fireplace surround not only enhances the aesthetic appeal of a room but also adds a layer of protection to your home. Using Sheetrock for this purpose requires careful planning, a good understanding of the material, and knowledge of building codes and safety regulations.
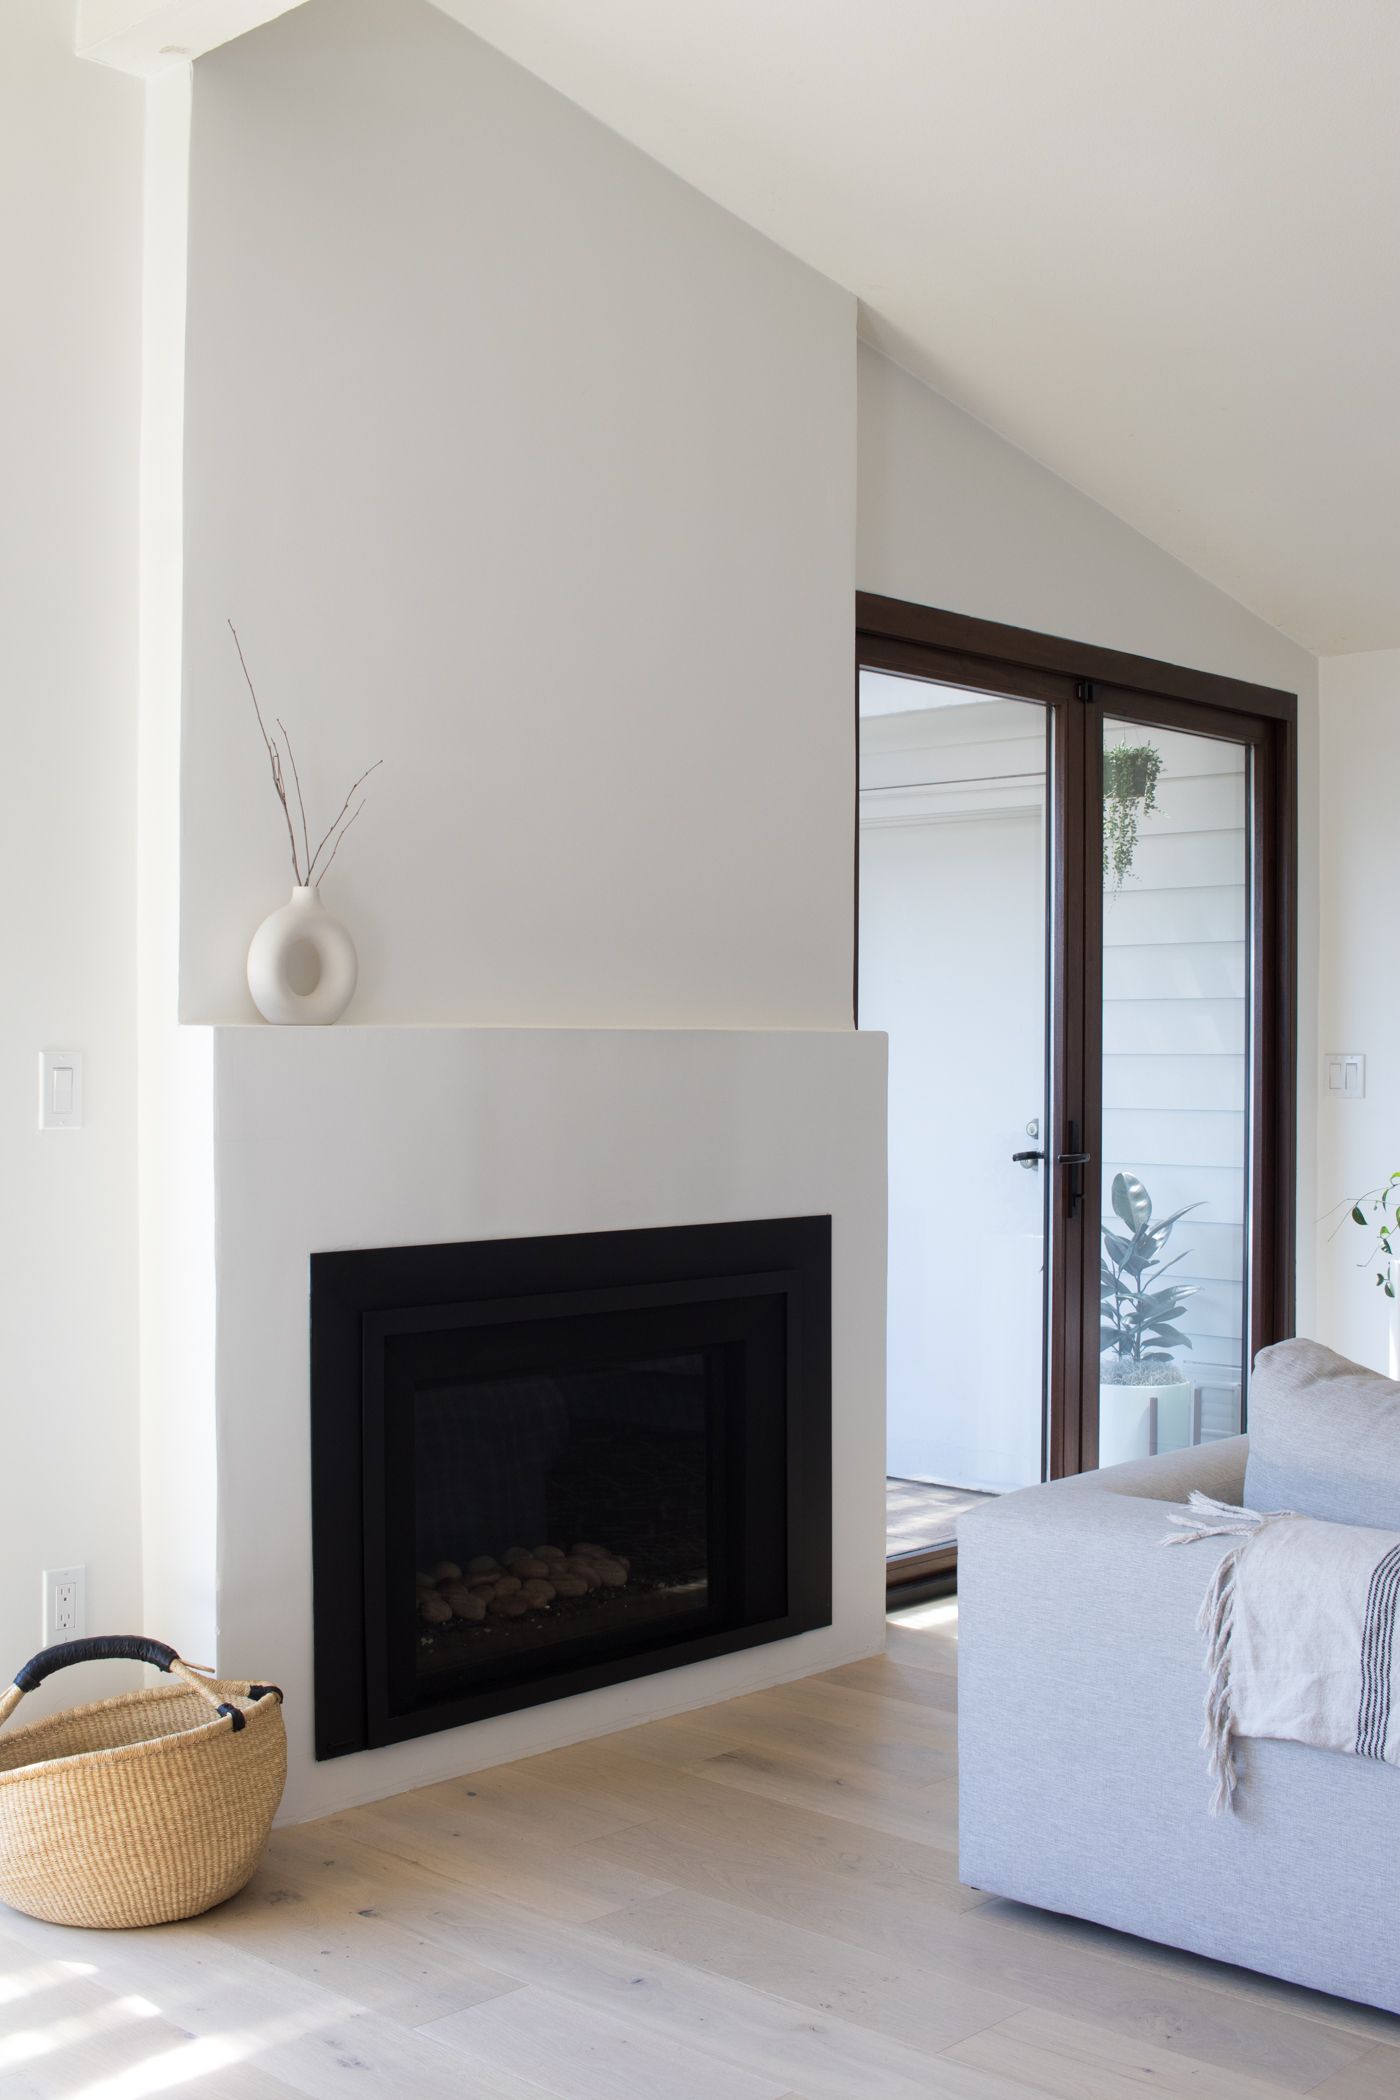
A Sheetrock fireplace surround provides a clean and smooth surface that can be painted or finished to match any interior decor. It can be installed in various styles, from traditional to contemporary, making it a popular choice among homeowners and designers. Despite its popularity, installing Sheetrock around a fireplace involves specific considerations to ensure durability, safety, and compliance with local building codes.

Understanding the properties of Sheetrock is crucial before beginning your project. Sheetrock is fire-resistant, but not fireproof. This means it can withstand heat to a certain degree but will deteriorate or even ignite if exposed to high temperatures for prolonged periods. Therefore, proper installation techniques and the use of additional fire-resistant materials are necessary to create a safe and lasting fireplace surround.
The installation process of a Sheetrock fireplace surround typically involves measuring and cutting the panels to fit around the fireplace, securing them to the wall frame, and finishing the seams with joint compound and tape. It’s essential to use the right type of Sheetrock, such as Type X, which is specifically designed to offer enhanced fire resistance. Moreover, incorporating insulation and a fire-rated caulk can further enhance the safety and effectiveness of the installation.
While the concept might seem straightforward, achieving a professional-looking result with a Sheetrock fireplace surround requires attention to detail and adherence to best practices. From selecting the right materials to executing the installation with precision, each step plays a vital role in the overall success of the project. This guide aims to provide a thorough understanding of the process, potential pitfalls, and tips for creating a beautiful and safe Sheetrock fireplace surround.

Selecting the Right Materials
Choosing the correct materials is the foundation of a successful Sheetrock fireplace surround project. The first and most important material is the Sheetrock itself. For fireplace surrounds, it’s advisable to use Type X Sheetrock, which contains special additives to enhance its fire resistance. This type of drywall is designed to provide greater protection against fire, making it suitable for areas exposed to higher temperatures.
In addition to Type X Sheetrock, consider the use of cement backer boards, especially for areas that are directly adjacent to the fireplace opening. Cement backer boards are more resistant to heat and moisture compared to standard drywall, providing an extra layer of protection. Installing these boards around the perimeter of the fireplace can help mitigate the risk of heat damage and prolong the lifespan of your surround.
Another crucial material is the insulation. Insulating the area behind the Sheetrock can significantly improve the fire resistance of the surround. Fire-rated insulation, such as mineral wool or fiberglass, can withstand high temperatures and prevent the spread of flames. Proper insulation not only enhances safety but also contributes to the energy efficiency of your home by minimizing heat loss.

Fasteners and adhesives are equally important in the installation process. Use fire-rated screws and nails to secure the Sheetrock and backer boards to the wall frame. These fasteners are designed to maintain their integrity under high temperatures, ensuring that the structure remains stable in case of a fire. Additionally, using a fire-resistant adhesive or caulk to seal the joints and seams will provide an extra layer of protection against heat and flames.
Finally, selecting the right finishing materials is essential for achieving a polished and professional look. Joint compound and tape are used to cover seams and screw heads, creating a smooth surface ready for painting or finishing. Opt for a high-quality joint compound that is easy to work with and provides a durable finish. Once the compound is dry, sand the surface to ensure it is smooth and even before applying paint or any other decorative finishes.
By carefully selecting the right materials and understanding their properties, you can create a Sheetrock fireplace surround that is not only aesthetically pleasing but also safe and durable. Investing in quality materials and taking the time to properly prepare each component will pay off in the long run, ensuring that your fireplace surround stands the test of time.

Installation Process
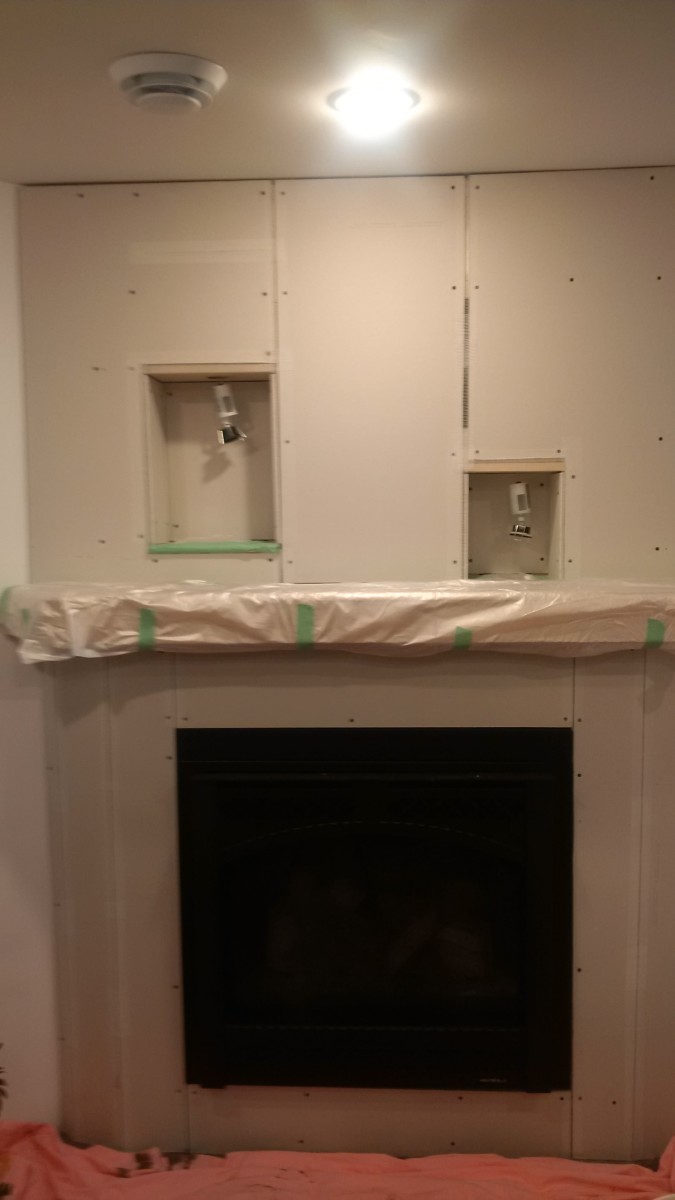
The installation process of a Sheetrock fireplace surround involves several steps, each requiring careful attention to detail. Proper preparation and execution are crucial to ensure the safety and durability of the finished product. Here is a detailed guide to help you navigate through the installation process effectively.
Step 1: Preparation
Begin by preparing the area around the fireplace. Remove any existing trim or decorative elements and ensure the wall surface is clean and free of debris. Measure the dimensions of the fireplace opening and the surrounding wall to determine the size and number of Sheetrock panels needed. Mark these measurements on the panels and use a utility knife to cut them to size. If you’re using cement backer boards for added fire resistance, cut them to the appropriate size as well.
Step 2: Installing the Backer Boards
Start by installing the cement backer boards around the perimeter of the fireplace opening. These boards provide an extra layer of protection against heat and flames. Secure the backer boards to the wall frame using fire-rated screws, ensuring they are flush with the wall surface. Leave a small gap between the boards and the fireplace opening to allow for thermal expansion.
Step 3: Attaching the Sheetrock
Once the backer boards are in place, it’s time to attach the Sheetrock panels. Begin by positioning the panels against the wall and securing them with fire-rated screws. Place the screws approximately 12 inches apart along the edges and at the center of each panel. Ensure the panels are tightly butted together, leaving no gaps between them. If necessary, trim the panels to fit around any obstacles such as electrical outlets or light switches.
Step 4: Finishing the Seams
After all the Sheetrock panels are securely in place, the next step is to finish the seams. Apply a layer of joint compound over the seams and embed a strip of drywall tape into the compound. Use a taping knife to smooth out the tape and remove any excess compound. Once the first layer is dry, apply additional layers of joint compound, feathering the edges to create a smooth transition between the panels. Sand the surface to achieve a smooth, even finish.
Step 5: Sealing the Edges
To further enhance the fire resistance of your Sheetrock fireplace surround, seal the edges and any gaps with a fire-resistant caulk. This will prevent flames or heat from penetrating the joints and seams, adding an extra layer of protection. Ensure the caulk is applied evenly and smoothly for a professional finish. Allow the caulk to dry completely before proceeding to the next step.
Step 6: Painting and Finishing
Finally, once the joint compound and caulk are fully dry, you can paint or finish the Sheetrock to match your interior decor. Use a high-quality, heat-resistant paint to ensure longevity and durability. Apply a primer first to create a smooth base, followed by one or two coats of your chosen paint color. Allow each coat to dry thoroughly before applying the next. If you prefer a different finish, such as wallpaper or decorative plaster, ensure it is suitable for use near a heat source.

Interesting Articles You May Want to Check:
- Free Standing Fireplace Surround
- Fireplace Surround Entertainment Center
- Antique Fireplace Surround
- Fireplace Mantels and Surrounds for Sale
- Gas Fireplace Surrounds and Mantels
Maintenance and Care
Maintaining a Sheetrock fireplace surround involves regular inspections and proper care to ensure its longevity and safety. Although Sheetrock is a durable material, it requires routine upkeep to keep it looking its best and functioning effectively. Here are some essential tips for maintaining and caring for your Sheetrock fireplace surround.
Regular Cleaning
Dust and debris can accumulate on the surface of the Sheetrock, diminishing its appearance over time. Regular cleaning is essential to keep it looking fresh and clean. Use a soft cloth or a microfiber duster to wipe down the surface, removing any dust and dirt. For more thorough cleaning, a damp cloth with a mild detergent can be used. Avoid using harsh chemicals or abrasive cleaners, as they can damage the finish and compromise the integrity of the Sheetrock.
Inspect for Damage
Periodically inspect the Sheetrock for any signs of damage, such as cracks, dents, or peeling paint. These issues can compromise the safety and aesthetics of the fireplace surround. Small cracks or dents can often be repaired with a bit of joint compound and a touch-up of paint. For more extensive damage, you may need to replace the affected panel entirely. Addressing these issues promptly can prevent further deterioration and maintain the structural integrity of the surround.
Monitor for Heat Damage
Given the proximity to the fireplace, it’s crucial to monitor the Sheetrock for any signs of heat damage. Discoloration, warping, or charring are indicators that the material is being exposed to excessive heat. If you notice any of these signs, it may be necessary to add additional insulation or a more heat-resistant barrier behind the Sheetrock. Ensuring that your fireplace is properly vented and that the heat is not directly impacting the Sheetrock will also help prevent damage.

Touch-Up Painting
Over time, the paint on the Sheetrock fireplace surround may fade or become discolored due to exposure to heat and smoke. Touching up the paint periodically will keep the surround looking fresh and vibrant. Before applying new paint, clean the surface thoroughly and sand any rough areas to ensure a smooth application. Use a high-quality, heat-resistant paint that can withstand the temperatures generated by the fireplace.
Maintain Caulking and Seals
The caulking and seals around the edges of the Sheetrock are vital for maintaining its fire resistance and structural integrity. Check these areas regularly for any signs of wear or deterioration. If the caulk is cracked or peeling, remove the old caulk and apply a fresh layer of fire-resistant caulk. Proper sealing will prevent heat and flames from penetrating the joints, enhancing the safety and durability of the fireplace surround.
Professional Inspections
In addition to your regular maintenance routine, consider having a professional inspect your fireplace and the surrounding Sheetrock periodically. A professional can identify potential issues that you may overlook and provide expert recommendations for repairs or improvements. Regular professional inspections can help ensure that your fireplace and its surround remain safe and functional for years to come.

Common Mistakes to Avoid
While installing and maintaining a Sheetrock fireplace surround can be a rewarding project, there are several common mistakes that homeowners often make. Avoiding these pitfalls can save you time, money, and frustration, ensuring a successful and long-lasting installation.
Using Standard Drywall
One of the most common mistakes is using standard drywall instead of Type X Sheetrock. Standard drywall lacks the necessary fire resistance for a fireplace surround and can pose a significant safety risk. Always use Type X Sheetrock or cement backer boards, which are designed to withstand higher temperatures and provide better protection against fire.
Inadequate Insulation
Skipping or inadequately installing insulation behind the Sheetrock is another common error. Proper insulation is crucial for enhancing the fire resistance of the surround and preventing heat from damaging the Sheetrock. Use fire-rated insulation materials, such as mineral wool or fiberglass, and ensure they are installed correctly to provide maximum protection.
Poor Sealing and Caulking
Failing to properly seal and caulk the edges and seams of the Sheetrock can compromise its fire resistance and structural integrity. Use fire-resistant caulk to seal all joints and gaps, ensuring a tight and secure installation. Neglecting this step can allow heat and flames to penetrate the seams, increasing the risk of fire damage.

Incorrect Fasteners
Using the wrong type of fasteners, such as standard screws or nails, can weaken the installation and reduce its fire resistance. Always use fire-rated screws and nails designed for use with Sheetrock and cement backer boards. These fasteners are specifically engineered to maintain their integrity under high temperatures, ensuring a stable and secure installation.
Insufficient Ventilation
Not accounting for proper ventilation around the fireplace can lead to excessive heat buildup and potential damage to the Sheetrock. Ensure that your fireplace is properly vented and that there is adequate airflow to dissipate heat. This will help prevent the Sheetrock from warping or deteriorating due to prolonged exposure to high temperatures.
Rushing the Finishing Process
Rushing through the finishing process, such as applying joint compound and paint, can result in a subpar appearance and compromised durability. Allow sufficient drying time between each layer of joint compound and sand the surface thoroughly for a smooth finish. When painting, use heat-resistant paint and apply multiple thin coats, allowing each coat to dry completely before applying the next.

xxx

What type of Sheetrock should I use for a fireplace surround?
For a fireplace surround, it is essential to use Type X Sheetrock, which is specifically designed to offer enhanced fire resistance. Type X Sheetrock contains special additives that allow it to withstand higher temperatures, making it suitable for areas exposed to heat from a fireplace. Additionally, consider using cement backer boards in areas directly adjacent to the fireplace opening for extra protection.
Can I install Sheetrock directly over brick or stone around my fireplace?
Yes, you can install Sheetrock over brick or stone, but it requires proper preparation. First, ensure the existing surface is clean and free of any loose debris. You may need to attach furring strips to the brick or stone to create a flat surface for the Sheetrock. Secure the furring strips with masonry screws, and then attach the Sheetrock to the strips using fire-rated screws. This method provides a smooth and even surface for the new fireplace surround.
How do I ensure the Sheetrock is properly insulated for fire safety?
Proper insulation is crucial for enhancing the fire resistance of a Sheetrock fireplace surround. Use fire-rated insulation materials, such as mineral wool or fiberglass, behind the Sheetrock. These materials can withstand high temperatures and help prevent the spread of flames. Ensure the insulation is installed correctly, filling all gaps and voids, to provide maximum protection and improve the overall safety of the surround.

What kind of paint should I use on a Sheetrock fireplace surround?
When painting a Sheetrock fireplace surround, it is important to use high-quality, heat-resistant paint. This type of paint is formulated to withstand higher temperatures and resist discoloration and peeling caused by heat exposure. Before applying the paint, use a primer to create a smooth base and enhance the adhesion of the paint. Apply one or two coats of heat-resistant paint, allowing each coat to dry thoroughly before applying the next.
How do I repair damage to a Sheetrock fireplace surround?
Repairing damage to a Sheetrock fireplace surround involves a few steps. For small cracks or dents, use a joint compound to fill the damaged area, then sand it smooth once it dries. For more extensive damage, such as large holes or significant heat damage, you may need to replace the affected panel entirely. Cut out the damaged section, install a new piece of Sheetrock, and finish the seams with joint compound and tape. Once repaired, sand the surface smooth and touch up the paint to match the surrounding area.
Related Posts: